
Why Build a Gmail CRM Integration Add-on?
Have you ever wanted to connect your company's CRM directly to Gmail, allowing your team to create and update deals without ever leaving their inbox? Building a Google Workspace Add-on using Google Apps Script is the perfect solution. It eliminates context switching, ensures your CRM stays up-to-date, and massively boosts sales productivity.
In this comprehensive guide, we'll walk through the entire process of building a Gmail Add-on that connects to a Custom CRM via REST API. We will cover everything from starting your project with a next-generation AI IDE, connecting it to version control, dealing with permissions, and finally deploying the product to your team.
Whether you're looking to automate your sales pipeline, reduce manual data entry, or simply modernize your Google Workspace automation strategy, this tutorial provides a production-ready blueprint.
Prerequisites
Before we dive into the code, ensure you have:
- A Google Workspace account (or standard Gmail account for testing)
- Node.js installed on your computer (for local development tools)
- A GitHub account (for version control)
- Basic familiarity with JavaScript and REST APIs
Step 1: Starting the Project with an AI IDE (Vibe Coding)
Modern development is supercharged by AI. For this project, we're using Antigravity, a powerful agentic AI coding assistant that helps you write, debug, and manage code autonomously directly inside your local environment. This approach is known as vibe coding — describing what you want in natural language and letting the AI generate production-quality code.
Instead of writing all the Google Apps Script boilerplate manually and fighting with the CardService UI builder, you can simply prompt the AI IDE:
"Create a new Google Apps Script project for a Gmail Add-on that connects to my CRM API. It should read the email participants, deduplicate them, search the CRM for existing deals, and provide an interface to either update an existing deal or create a new one."
The AI will generate the two most critical files for any Add-on:
Code.js: Contains all your business logic, UI building, and API interactions.appsscript.json: Your manifest file which tells Google how the Add-on should behave.
Example: Extracting Email Context
One of the most powerful features of a Gmail add-on is reading the current context. Using Apps Script, your code can instantly extract everyone involved in a thread:
function onGmailMessageOpen(e) {
  var messageId = e.gmail.messageId;
  var accessToken = e.gmail.accessToken;
  GmailApp.setCurrentMessageAccessToken(accessToken);

  var message = GmailApp.getMessageById(messageId);

  // Extract all participants from From, To, CC, and BCC
  var allParticipantsRaw = [];
  allParticipantsRaw = allParticipantsRaw.concat(
    extractParticipants(message.getFrom())
  );
  allParticipantsRaw = allParticipantsRaw.concat(
    extractParticipants(message.getTo())
  );

  // Deduplicate these, filter out internal company domains,
  // and query your CRM API to see if a deal already exists!
}
By using vibe coding with Antigravity, you can rapidly iterate on this UI design, debug API payload errors when talking to your CRM, and automatically refactor code — saving hours of tedious development time.
Accelerate Your Development with Vibe Coding
Stop writing boilerplate code manually. Vibe coding lets you describe what you want and AI generates production-ready code in seconds.
Explore our Vibe Coding services and start building faster →
Step 2: Setting up clasp for Local Development
While Google provides a browser-based Apps Script editor, developing locally is infinitely better. It lets you use version control (Git), your favorite IDE, and AI tools like Antigravity. Google provides a command-line tool called clasp (Command Line Apps Script Projects) specifically for this workflow.
1. Install Clasp Globally
Open your terminal and install the clasp package via npm:
npm install -g @google/clasp2. Login to your Google Account
Authorize clasp to manage your Google Apps Script projects:
clasp loginThis will open a browser window asking you to authorize clasp with your Google account. Click "Allow".
3. Initialize the Project
Navigate to your local project folder and create a new Apps Script project:
clasp create --type standalone --title "MDS CRM Gmail Add-on"Note: If you already created the project in the browser, you can instead grab the Script ID from the URL and run clasp clone <Script ID>.
This creates a .clasp.json file in your directory, which maps your local folder to the remote Google Apps Script project. From now on, whenever you want to push your local code to Google, you simply run:
clasp push -fStep 3: Apps Script Dashboard Setup
Even when developing locally, your code executes in the Google Apps Script environment. You need to configure a few settings in the cloud.
- Go to the Google Apps Script Dashboard.
- You should see your newly created "MDS CRM Gmail Add-on" project in the list. Click to open it.
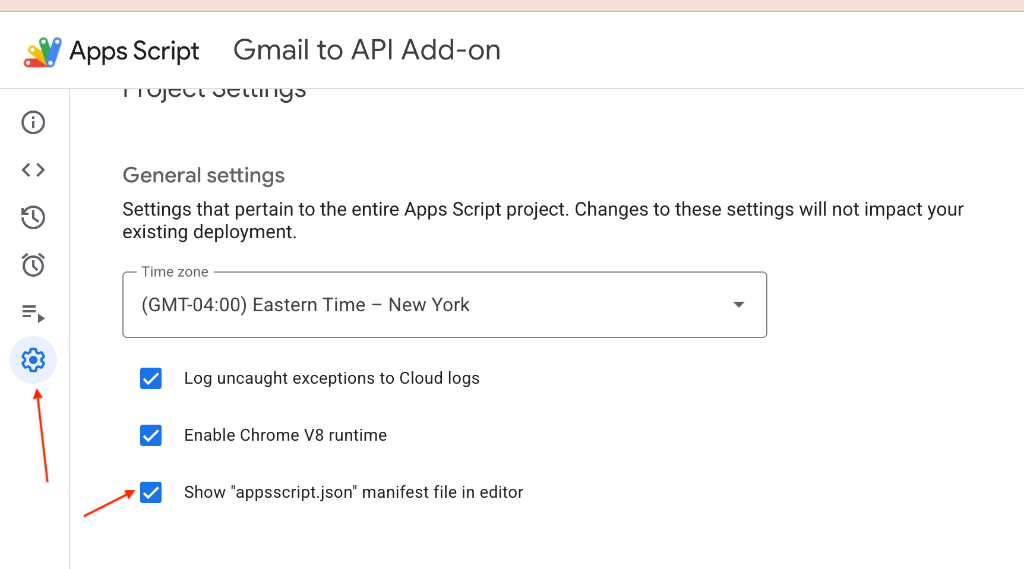
- Click on the Project Settings (the gear icon) on the left-hand sidebar.
- CRITICAL: Check the box that says "Show 'appsscript.json' manifest file in editor".
This is crucial because your add-on's UI triggers, API scopes, colors, and metadata are all defined in this manifest. If this isn't visible, clasp might overwrite it incorrectly, or you won't be able to debug permission issues.
Step 4: Connecting Code with Git (Version Control)
Because we are developing locally with clasp, we can treat our Apps Script project like any normal software project and track changes using Git.
1. Initialize Git
In your project folder, initialize a new repository:
git init2. Configure Ignore Files
You don't want to push your README.md to Google Apps Script, and you don't want to push your .clasp.json (which contains your script ID) to a public GitHub repo.
- Create a
.claspignorefile and addREADME.mdand.git/. - Create a
.gitignorefile and add.clasp.json(optional, but recommended if open-sourcing).
3. Commit and Push
git add .
git commit -m "Initial commit: CRM Gmail Add-on with Deal Matching"

# Create a new repository on GitHub and push
git remote add origin https://github.com/yourusername/MDS-CRM-GMAIL-ADDON.git
git push -u origin main
Now you have a robust workflow: Antigravity writes the code → You commit to Git for history → You run clasp push -f to deploy to Google.
Need a Custom Integration Built?
From Gmail Add-ons to full API integrations, our team delivers production-ready automation solutions tailored to your workflows.
Step 5: Configuring Permissions (OAuth Scopes)
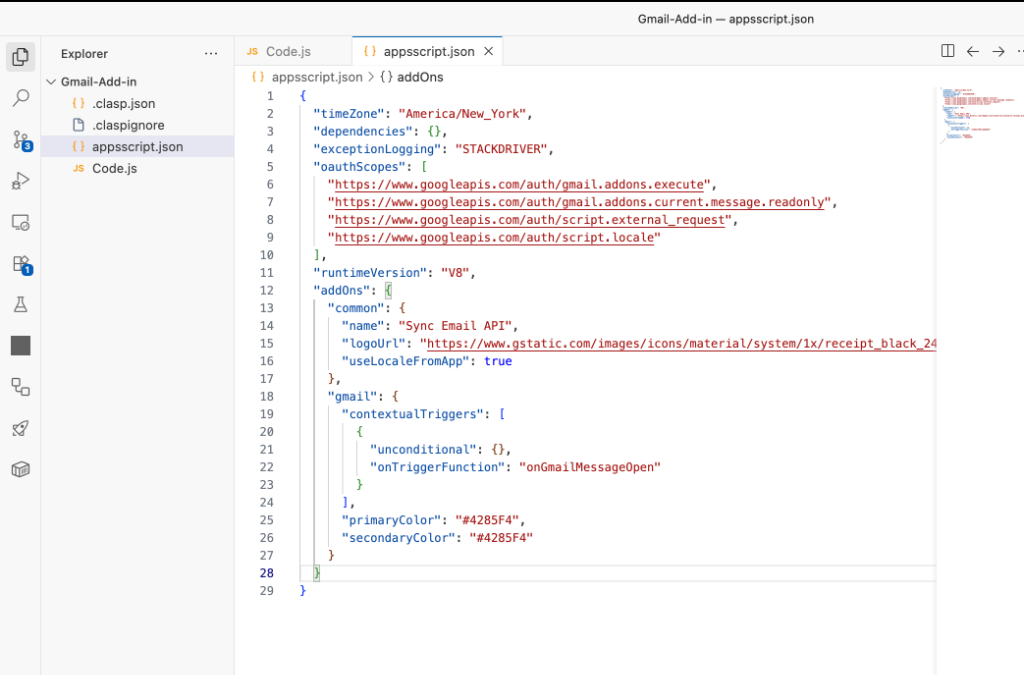
Google takes security very seriously. For a Gmail Add-on to read user emails and communicate with an external CRM REST API, it must explicitly declare the permissions it needs. These are defined in your appsscript.json manifest file.
For a CRM integration, your manifest will look something like this:
{
  "oauthScopes": [
    "https://www.googleapis.com/auth/gmail.addons.execute",
    "https://www.googleapis.com/auth/gmail.addons.current.message.readonly",
    "https://www.googleapis.com/auth/script.external_request",
    "https://www.googleapis.com/auth/script.locale"
  ],
  "addOns": {
    "gmail": {
      "contextualTriggers": [
        {
          "unconditional": {},
          "onTriggerFunction": "onGmailMessageOpen"
        }
      ]
    }
  }
}
What these scopes actually do:
gmail.addons.execute: The baseline permission required for the add-on to run at all.gmail.addons.current.message.readonly: Crucial for reading the current email's Subject, To, From, and CC fields. Without this, your add-on cannot automatically find contacts in your CRM based on the email thread.script.external_request: Required to makeUrlFetchAppcalls. If you don't include this, your API requests tohttps://metadesignsolutions.com/api/v1/dealswill immediately fail.script.locale: Allows the add-on to adapt to the user's language settings (often required ifuseLocaleFromAppis set to true).
Step 6: Deploying the Add-on to Gmail (Developer Testing)
Once your code is written and pushed to Google via clasp, it's time to test the UI inside actual Gmail.
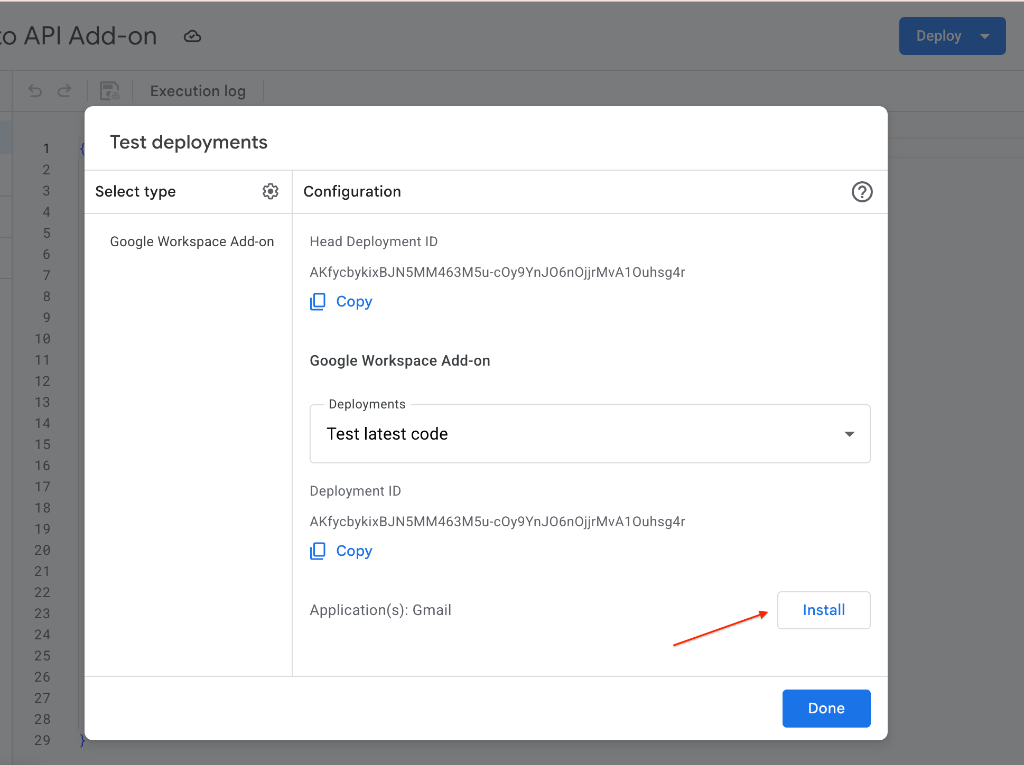
- Inside the Apps Script Editor in your browser, click the blue Deploy button in the top right corner.
- Select Test deployments.
- Set the "Select type" dropdown to Google Workspace Add-on.
- Click Install.
Note on Security Warnings: Because this is your own unpublished app, Google will show a "Google hasn't verified this app" warning. Click Advanced, then Go to [Project Name] (unsafe), and click Allow to grant the OAuth scopes we defined in Step 5.
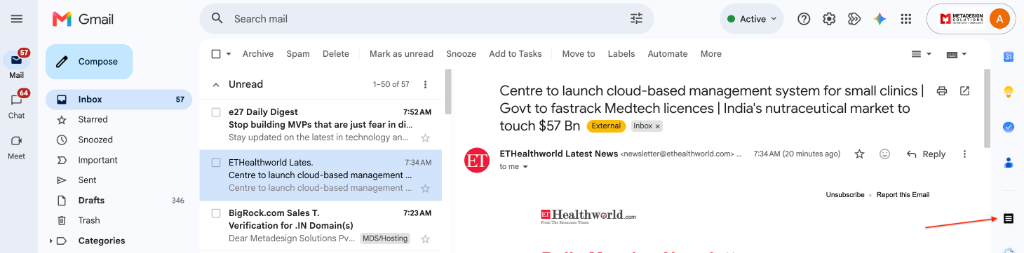
- Open your Gmail inbox in a new tab and refresh the page.
- Open any email thread. You will now see your Add-on's icon in the right-hand sidebar! Click it to execute your
onGmailMessageOpentrigger and see your CRM data.
Step 7: Sharing the Add-on with Other Users
Before publishing your Add-on company-wide via the Google Workspace Admin Console (which requires standard GCP project linking and OAuth verification), you'll likely want a few colleagues to beta test it.
Because it is an unpublished script, colleagues can install it via the exact same "Test Deployment" method — but only if they have the right permissions to the script.
Instructions for You (The Developer):
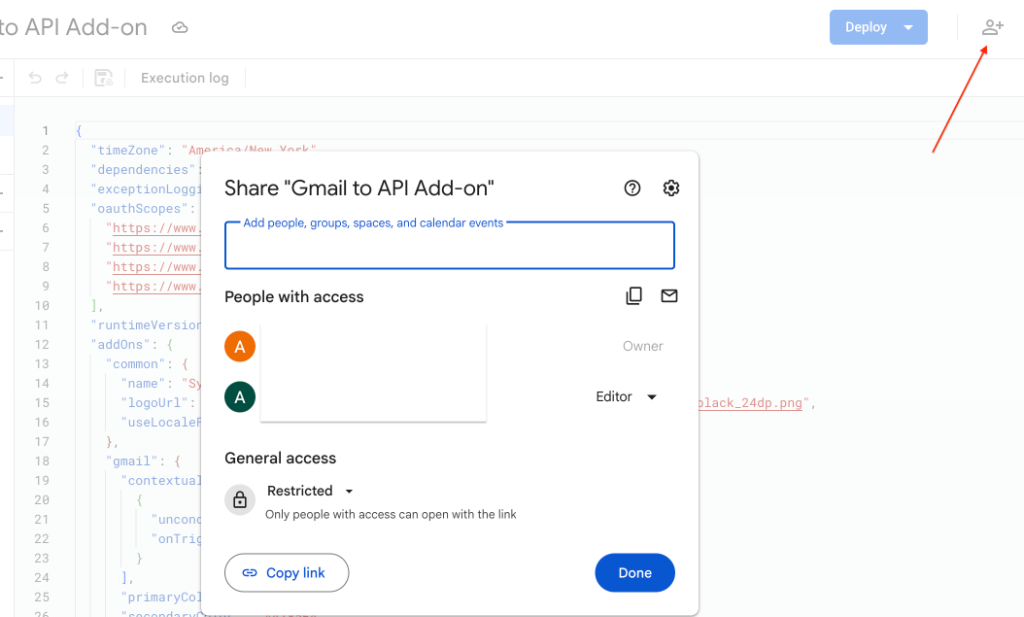
- Open your project in the Apps Script Dashboard.
- Click the Share button (the person icon with a
+in the top right). - Add your colleague's email address.
- CRITICAL STEP: You must grant them Editor access. (Note: Users with only "Viewer" access will NOT see the Deploy button and therefore cannot create a Test Deployment to install the add-on).
Instructions for the Tester (Your Colleague):
Share these steps with the person testing your add-on:
- Log into your Google account and go to the Apps Script Dashboard.
- On the left menu, click Shared with me.
- Click on the project name (e.g., "CRM Gmail Add-on") to open the editor.
- In the top right corner, click the blue Deploy button, then select Test deployments.
- Ensure the application type is Google Workspace Add-on and click Install.
- Follow the on-screen prompts to grant permissions (including bypassing the "Unverified App" warning).
- Go to your Gmail inbox, refresh the page, open an email, and click the new icon in the right-side panel to start managing CRM deals directly from your inbox!
Need a Custom Gmail Add-on Built for Your Business?
Building custom Gmail Add-ons and Google Workspace integrations is one of our core specialties. From CRM connectors to invoice processors, our team delivers production-ready Google Apps Script solutions that your team will love.
Explore our Gmail Add-on development services and get a free consultation →
Conclusion: From Inbox to CRM in Seconds
Building a custom Gmail Add-on doesn't have to be a painful process of managing browser tabs and manually pasting code. By utilizing an AI IDE like Antigravity to generate complex API logic, clasp to manage deployments locally, and Git for version control, you can build enterprise-grade internal tools incredibly fast.
Your sales and support teams will thank you when they no longer have to copy-paste email subjects and attachments between Gmail and the CRM!
The combination of vibe coding, Google Apps Script, and modern DevOps practices like clasp represents the future of Google Workspace automation. Whether you're building a simple email parser or a full-fledged CRM integration, this workflow scales to meet your enterprise needs.
Keywords: Gmail Add-on development, Google Apps Script CRM integration, vibe coding, clasp deployment, Google Workspace automation, Gmail CRM connector, sales productivity tools, AI-powered development, custom Gmail extension, REST API integration


